ANZAC Biscuits

I’m not from Australia, but has celebrated a number of ANZAC days ever since I’ve been in Australia. To get a more in depth explanation of what it’s all about head here. And it’s usually not Anzac day without ANZAC biscuits – plus my daughter’s grade has got this ANZAC Bake Off, so I thought I’d put in a bit of practice before the real date. I got this recipe from my favourite baking book – The Baking Bible.

Ingredients:

100gm butter (melted)

2 tablespoons golden syrup

2 tablespoons boiling water

1 teaspoon bicarbonate soda

1 cup plain flour

1 cup white sugar

2 cups rolled oats

3/4 cups desiccated coconut
Method:

Heat oven to 190 degrees Celsius. Mix the melted butter, golden syrup, boiling water and bicarb soda in a bowl and mix well. In a separate bowl, mix the rest of the ingredients and then add the wet ingredients. Mix well and then roll balls of the mixture onto a greased and lined tray and with a fork flatten each ball. Bake in the oven for 10-15 minutes or until golden brown. When ready, take it out of the oven and place it onto a wire rack to cool.


Chicken Rice – My Style

This recipe isn’t the traditional style Hainanese Chicken rice, instead, true to my “Fusion” style, I’ve modified it to suit my lifestyle, and my family’s taste. So instead of having to toast the uncooked rice, I’ve skipped that step completely and instead of using stock made from scratch, I’ve cheated and used the store bought ones instead – hey, I did say to suit my lifestyle.

Ingredients:

3 cups of rice (uncooked)

3 cloves of garlic

Ginger (thumb size)

Salt

3 cups of stock

Method:

Wash the rice and place it in the rice cooker (yup I cheat, I use a rice cooker, these are modern times after all!). Pound the garlic and ginger together with a bit of salt until it forms sort of a paste. Saute the paste in some oil until it gives a off a fragrant scent. Remember NOT to burn the garlic. Then add this, including the oil, into the rice. Add the stock and let it cook.

That’s the rice done. Chicken rice isn’t chicken rice without the chicken, and there are so many variations to this. The traditional way is to poach the chicken and to eat it cold with the rice. There’s also the roast chicken version. Here’s my version of the roast chicken.

Ingredients

1.2kg whole chicken

1 tablespoon Light Soy Sauce

1 tablespoon Sweet Soy Sauce (Kicap Manis)

Salt & Pepper to taste

1 tablespoon Oil (vegetable/olive)

Method

Heat the oven to 200 degrees Celsius. Wash and pat the chicken dry. In a small bowl add the light and sweet soy sauce, salt and pepper and oil. Mix this sauce then rub it all over the chicken (on the outside and inside of the cavity). Place it on a roasting tray, and plonk it in the oven, breast side up,  for around 1 1/2 hrs. You can choose to turn the chicken after an hour to let the ribs side crisp up as well.

The Dipping Sauces

Add another dimension to your meal with some easy dipping sauces. The first one is garlic soy sauce, a recipe I learned from my mother-in-law.

Ingredients:

3 cloves of garlic

2 tablespoons light soy sauce

Method:

Mince the garlic (please DO NOT use store bought minced garlic – fresh is best in this case). Pan fry in some oil – actually quite a bit of oil. Remember NOT to burn the garlic, so keep it on a low heat. Then, turn off the heat and add the soy sauce. Yes, there would be some oil in the sauce – that’s the way it should be.

Next is the Chilli Sauce:

Ingredients:

3 cloves garlic

Ginger (1/2 thumbsize)

Salt to taste

3 tablespoons Sambal Oelek (available in a jar at your Supermarket in the Asian food aisle)

Method:

Pound the garlic, ginger, salt together to form a paste. Add the sambal oelek and mix through. That’s it!
Hope this will demystify the secrets of cooking chicken rice. And I’ll try and post some photos the next time I do make this.

Coconut Ice

Coconut Ice

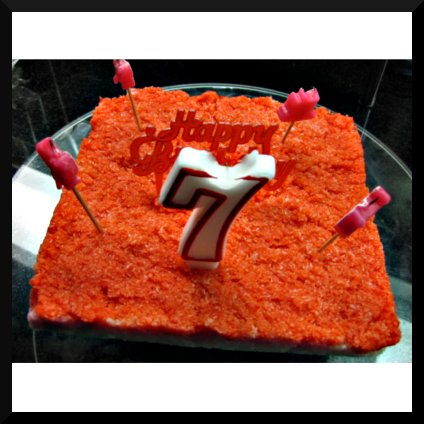
I was trawling through so many recipes for Coconut Ice, as requested by Miss 7 to make for her birthday, instead of a birthday cake. Most of them either used a lot of icing sugar, condensed milk, Copha or, all of them! So I found one on the Internet and adapted it to my  liking, not too much of the sweetness or fat. I ran out of pink colouring so opted for what ever that was in my pantry that day – RED! A bit striking I admit, but it tasted pretty good!

Ingredients:

200g white sugar

2 tsps butter

250gms of dessicated coconut

180ml milk

1/4 tsp salt

1/4 tsp cream of tartar

2 tbs condensed milk

few drops of food colouring of your choice

Method:

Grease and line a 20cm cake tin with baking paper. Place sugar, butter, milk, and salt in a saucepan, bringing it to boil for around 5 – 7 minutes. Remove the saucepan from heat and add in the coconut and cream of tartar, stir and  mix them well. Then add the condensed milk and mix thoroughly. Divide the mixture into two parts. Then into one, add the food colouring and mix it through.

Mixing coconut ice

Pour the uncoloured mixture into the tin and press into the tray.

Placing 1st layer of coconut into tin

Then add the rest of the coloured mixture on top of the first layer and press it in. Place the tin into the fridge to set. Once set you can cut it into pieces. It normally takes about a day or even lesser for the mixture to set. This recipe isn’t too sweet or heavy, great for those occasional lunch box treats or as a decadent dessert.

Mini Chicken Patties

Chicken Patties

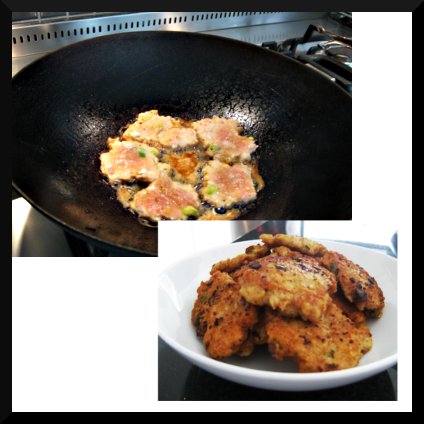
Another family favourite, which I think also makes a good picnic snack, when dipped with either sweet chilli sauce or guacamole. Normally this acts as one of our side dishes eaten together with rice.

Ingredients:

500g chicken mince (preferably thighs minced)

2 tbs Breadcrumbs (for coating)

1 tsp Chinese 5 spice powder

3 stalks of spring onions chopped

White pepper, salt

1 egg

Oil for pan frying

Method:

Mix all ingredients into a bowl. When thoroughly mixed, start heating your oil in your pan or wok. Using two spoons, scoop some of the mixture in one and flatten it with the other spoon, making it into a mini patty. Pan fry until it’s brown on both sides. The thinner your patty the quicker it cooks through.

Coconut cupcakes

I got this recipe from the “Crabapple Bakery Cupcake” cookbook. It’s a fantastic book that has lots of very useful tips and handy hits. Simple hints like not using cold eggs or milk, not overbeating, creaming your butter before adding the sugar and alternating the flour and the liquids when mixing instead of dumping them all in. This book as ensured my cupcakes and cakes turn out beautifully delicious! This particular recipe is a family favourite as unlike most cupcakes, it is subtle and not sickly sweet. When not making cupcakes, I use 2 x 20×20 cm round cake tins to make the cakes. This recipe makes 24 cupcakes.

Ingredients:

3/4 cup shredded coconut or desiccated coconut

2 1/3 cups plain flour

1/4 tsp salt

2 tsp baking powder

3 eggs

3 egg whites, extra

200g softened unsalted butter

1 3/4 cups castor sugar

1 tbs vanilla extract

1 cup coconut milk
Method:

Preheat oven to 170 degrees Celsius. Line two 12-hole muffin tins with cupcake papers.

If you are using shredded coconut – process the coconut in an electric food processor until very fine first. If not then you can immediately add it to the sifted flour, salt and baking powder. Mix until they are combined evenly.

In a separate bowl combine the eggs and egg white without beating them.

In another bowl, cream the butter for 1-2 minutes. Add the castor sugar a third at a time, beating for 2 minutes after each adition. After the last addition, beat until the mixture is light and fluffy and teh sugar has almost dissolved.

Add the eggs a quarter at a time, beating for 1 minute after each addition or until the mixture is light and fluffy. Add the vanilla extract and beat until combined.

Add 1/3 of the flour mixture and beat on low speed until combined. Then add 1/2 of the coconut milk. Repeat this process and then add the remaining flour mixture. Do not overbeat.

Spoon the mixture into cupcake papers and bake for 18 minutes or until skewers come out clean. Once baked, remove the cupcakes and cool on wire rack immediately. Only ice the cupcakes 30 minutes after they have cooled down.

Frosting:

Vanilla Buttercream/Coconut Icing (enough for a cake/ 24 cupcakes)

Cream 200g of softened unsalted butter for 1-2 minutes. Add the 1/2 cup of milk or coconut milk, 1 tbs vanilla extract and 1/2 of the 8 cups of the sifted icing sugar and beat for at least 3 minutes.  Then add the remaining icing sugar and continue beating for another 3 minutes or until light and fluffy. If you find that the mixture is too dry, add more liquid, if it’s too wet, then add more icing sugar. The mixture should be of spreadable consistency.  This is also the time for you to add your colouring. Add a drop at a time and beat until you reach the required colour.

Butter Cookies

There are many butter cookies recipes out there. I tried this one this year and it turned out pretty well. This is great as gifts if you wrap them up in cellophane, or to give to your children’s classmates as a substitute for candy canes. This recipe was from the Hummingbird Bakery cookbook that I got for a bargain at a party.

Ingredients:

200g unsalted butter (softened)

280g caster sugar

1/4 tsp vanilla extract

1 egg

400g plain flour

a pinch of salt

1/2 tsp cream of tartar

Cookie cutters

Royal Icing or Simple Icing for decoration.

Method:

Line baking trays with baking paper and preheat the oven to 170 degrees celsius. Mix the butter, sugar and vanilla extract and cream until light and fluffy. Add the egg and mix well. Add in the flour, salt and cream of tartar. Mix well but don’t overmix. You should have a light, soft and easy to handle dough.

Roll out the dough on a lightly dusted surface. Cut out the shape you want with the cookie cutters. Then place them on the baking trays and bake for around 10mins. They should be a light golden colour. Once they are ready, remove from oven and leave to cool slightly. Place on wire cooling racks for them to cool completely, then decorate.

Gingerbread Cookies

Gingerbread Cookies

This recipe is pretty easy and delicious too! You can use the traditional gingerbread men cookie cutters or if like me don’t have one, simply use any shaped cutters. To decorate you can also use royal icing or simple icing.These recipe was from my favourite book – the Baking Bible.

Ingredients:

125g butter

2 tbs golden syrup

3/4 cup white sugar

1 egg – beaten

2 cups self-raising flour – sifted

pinch of salt

2 tsp ground ginger (ginger powder)

For decorating: currants, cherries, liquorice, chocolate chips or whatever you can think of!

Method:

Preheat oven to 150 degrees celsius. Line trays with baking paper.

Melt the butter and golden syrup over low heat and then remove from stove and stir in the sugar and egg.

Add the flour, salt and ginger and mix well.

Turn it out onto a lightly floured surface and knead until it forms a soft ball. Roll out thinly and cut out the shapes using the cookie cutters. Decorate the cookies (except if using icing, wait until it has been baked and cooled). Bake in the oven for 10mins or until golden brown.

Great for lunch box treats and Christmas gifts too!

Easy Chocolate Mud Cake

This is one of my favourite chocolate cake recipes. It’s easy (hence the name), and seriously, better than sex! Seriously, ask those who have tried this cake. Decadent, and delicious, excellent for those days when you’re feeling down or when the weather’s too cold and dreary. Have this with a good cup of coffee or tea even. Better yet, make it an even more orgasmic experience by finishing it off with a glass of milk…yummm…This recipe was from December 2005’s Super Food Ideas by Janelle Bloom. Instead of melting the chocolate in the microwave, I’ve just used a bain marie. It’s a great cake to bake when you really don’t have time to wait for the butter to soften! I’ve also substituted 50g of the dark chocolate for Mars bars

Ingredients:

200g butter – chopped

250g good-quality dark chocolate

50g Mars bar or any of your favourite chocolate bars – chopped

1/4 cup cocoa powder

1 tsp vanilla extract

1 cup caster sugar

3 eggs – lightly beaten

3/4 self raising flour (sifted)

pure icing sugar – to dust

strawberries to decorate (optional)

Method:

Preheat the oven to 160 degrees Celsius and grease and line a 20cm round cake tin.

Place butter, 200g chopped dark chocolate into a heatproof bowl. Put the bowl over simmering pot of water, making sure the bowl doesn’t touch the water in the pot. Stir the mixture with a metal spoon, until smooth. Once melted, add the cocoa to the warm mixture. Stir until smooth. Add in the vanilla, caster sugar and eggs and stir. Add the sifter flour and stir gently to combine.

Pour half the batter into the cake tin. Chop the remaining chopped dark chocolate. Place the 50g of chopped Mars bars over the batter. Top with the remaining batter and the rest of the chopped chocolate. Bake for 55 to 60 minutes or until a skewer has moist crumbs clinging when inserted into the centre.

Once cake is cooled completely in the pan, remove the cake and dust with icing sugar and decorate with strawberries.

Hummus

This dip is a hit with my kids and girlfriends. It’s quick and you really only need the pantry essentials. Great with crudites, toasted bread and even great as a spread for your sandwiches.

Ingredients:

1 can of chickpeas (400g)

1 clove of garlic (add another if you like it a bit more spicy)

A small handful of fresh corriander

1 tsp tahini

Sweet paprika (to your liking)

1 tbsp sweet chilli sauce (this hint is courtesy of my dear friend Alanna)

1 – 2 tsp lemon juice.

Olive oil

Salt to taste

Method:

Drain the canned chickpeas, but reserve a little of the liquid so that the mixture would not turn out to be too dry. Put the chickpeas, garlic and coriander into a food processor. Blitz. Add the oil while blitzing the mixture. Once it is to the consistency that you are happy with, add the salt, sweet paprika, sweet chilli sauce and pulse until mixture comes together nicely. If it’s too dry, add the liquid from the can of chickpeas. Taste and see if the dip is to your liking. Add more of either salt, paprika or sweet chilli sauce if you think it needs it. Remember, this recipe is not set in concrete. Instead of paprika you can also use ground cumin, Cajun spices or even Moroccan spices if you like.

Zucchini Slice

This zuchinni slice is great for kids who just don’t like their veggies. It’s healthy, quick, easy and yummy too!

Ingredients:

1 small onion diced

2 cups of grated zucchini

1/2 cup grated carrots (optional)

3 eggs – lightly beaten

1 cup of grated tasty cheese

1 tbsp olive oil

1 cup plain flour

1 tsp baking powder

Method:

Preheat oven to 180 degrees celsius. Grease a casserole pan or ceramic baking dish.

Fry the onions up until transparent. Add all ingredients into a bowl and mix them well. Add salt and pepper to taste. Pour into prepared greased dish and cook in the oven for 30 minutes or until brown.

You can also add any bacon, cold cuts (turkey/ham), if you like into the mixture.